Background
Isilon, if you’re not aware of it, is a clustered Scale-out NAS solution from EMC. The article below covers setting up a virtual Isilon cluster suitable for experimenting and testing out Isilon in a VMware ESXi-based lab environment.
Scenario and scope
- Create a 3-node virtual EMC Isilon storage cluster on VMware ESXi.
- This guide is written for ESXi Standalone (Free edition) in my home lab, but should be applicable to a “real” Virtual Infrastructure setup with vCenter, too.
Obtain EMC Isilon Virtual Machine files
Download the Isilon OneFS VM files from www.emc.com/getisilon (alternative link)
You’ll need to sign up for an EMC account. You do not need to be an EMC customer to download the Isilon VM, and I’ve confirmed this using a personal EMC account rather than my company one. In previous editions of EMC Isilon Virtual Nodes, I believe you needed to be a customer to download the Isilon OneFS Virtual Node.
Setup ESXi networking
Create a new private vSwitch called something like IsilonInternal. By private I mean, it doesn’t need to be connected to a physical/public facing NIC. This is used for the Isilon nodes to talk to each other on an internal network.
Prepare and upload the VMs to the ESXi host
Note: Unlike the .pdf instructions, we can’t use the VMs inside the “clone*” folders which you’d normally use with VMware Workstation. They won’t convert for some reason, and I can’t figure out why at the moment.
Extract the .zip file you downloaded from EMC earlier (for example EMC_Isilon_OneFS_7.1.0.1_Simulator.zip)
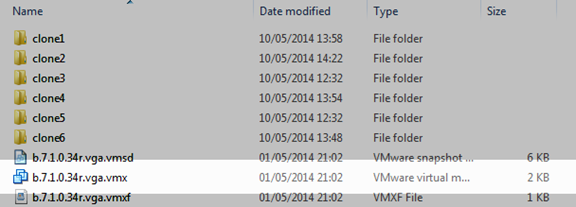
You should now have a folder called something like EMC_Isilon_OneFS_7.1.0.1_Simulator. Inside that, will be a folder beginning with b (such as b.7.1.0.34r.vga). Inside that folder, is the VM files we need which we’ll convert into multiple Isilon VM nodes.
In particular, make a note of where the .vmx file is:
Convert VMs to be ESXi-compatible
Next, convert the VMs from Workstation VMs to ESXi-compatible ones.
It’s important you do this, because if you simply upload the clone VMs I mentioned earlier to the datastore and “Add to Inventory”, the VMs will not boot and you’ll get nasty errors when powering on the VMs like:
“VMware ESX cannot find the virtual disk “/mnt/cribsbiox/machine_templates/onefs_builds/b.7.1.0.34r.vga/isi-nvram.vmdk”. Verify the path is valid and try again.”
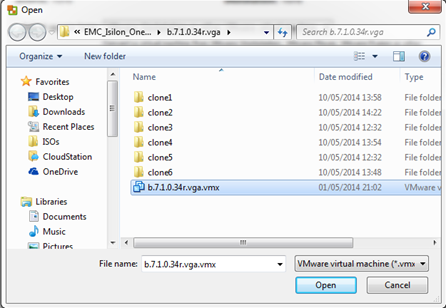
- Use VMware vCenter Converter Standalone to convert the VMs and upload them to your ESXi host.
-
Some quick tips:
- Repeat the conversion steps for the number of nodes you want. So if you want 3 nodes, convert the same VM 3 times (and give it a new name each time).
-
The source Virtual Machine File you want is the vmx file highlighted above.
</div>
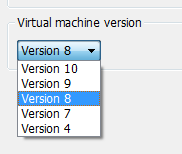
* <span style="color: black;"><br /> </span> 3. <span style="color: black;">Name the VM the same as the hostname. For example: isilon-node-001<br /> </span> 4. <div> <span style="color: black;">Change the VM version to Version 8. You don’t need anything higher, and you especially do not want to have a Version 10 VM with the free edition of ESXi as v10 VMs can only be managed from vSphere Web Client, which isn’t available for Free Edition of ESXi.<br /> </span></div>
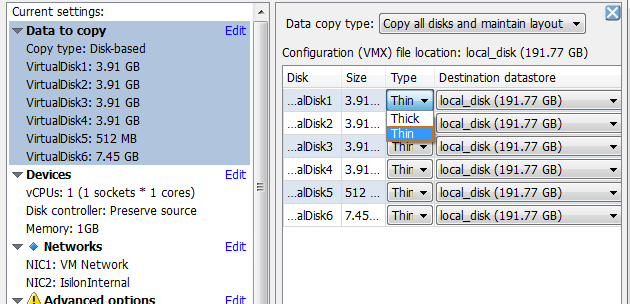
* <span style="color: black;"><br /> </span> 5. <div> <span style="color: black;">Change all the disks to Thin provision if you want to save space (and speed up the conversion)<br /> </span></div>
* <span style="color: black;"><br /> </span> 6. <div> <span style="color: black;">Change the network for NIC1 to be the new vSwitch you created (e.g. IsilonInternal)<br /> </span></div>
*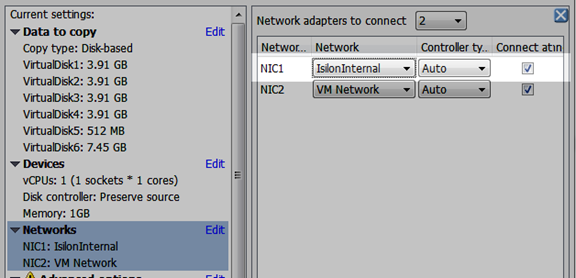 <span style="color: black;"><br /> </span> - Repeat the conversion steps for the number of nodes you want. So if you want 3 nodes, convert the same VM 3 times (and give it a new name each time).
Setting up the Isilon nodes
-
Power on each VM you’ve just created, and use the vSphere client to look at the Console of the VM itself (click on VM –> Console tab)
*

- For configuring the nodes themselves, there’s a .pdf inside the .zip you extracted earlier which runs through how to setup the Isilon nodes. If you follow it from around page 9 onwards, you’ll be able to follow the configuration wizard and add the other nodes afterwards (it talks about formatting the drives). The whole setup of 3 nodes took me about 10 minutes. It’s really very easy!

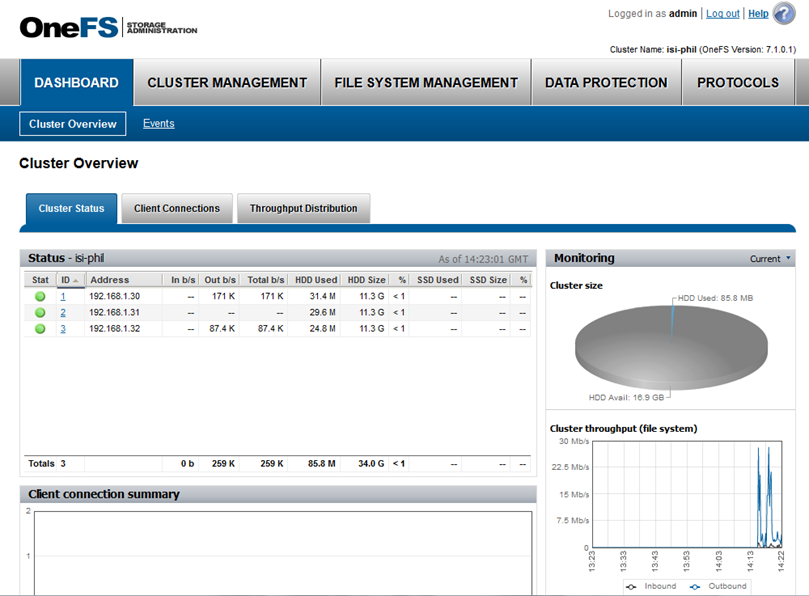
Dashboard
And here’s what it looks like when you connect to the Dashboard post-configuration:
Comments/Feedback?
Let me know how you get on with this! I always welcome comments and feedback 🙂