2013-09-23 00:27: Added information about ESXi 5.5 not including RTL8111E support
2013-09-23 22:23: Added a link to installing ESXi 5.5 with RTL8111E support
In my last post, I covered my journey of finding a small, quiet, low-power virtualisation lab computer that can run nested virtualisation.
The final system
To summarise, here’s the system I ended up with, after much consideration:
- Gigabyte Brix, Core i5 barebones kit (GB-XM11-3337) [Buy in the UK]
- 16GB (2x8GB) SO-DIMM Crucial RAM
- Plextor M5M 256GB SSD [Buy in the UK]

Total cost was roughly £575 ($920), but if you opt for a more modest Core i3 with 8GB RAM and a 128GB SSD you can make it as little as £370 ($600), which is much more palatable. Here’s a rough shopping list.
Power consumption idles around 12 watts running VMware ESXi 5.1 and I’ve seen it go up to 25 watts when I was loading it pretty hard with Turbo Boost at full pelt and the SSD being written to constantly.
I chose a higher-spec, more expensive system than I normally would, as I wanted to run an entire Nested Virtualization lab inside it including:
- Multiple ESXi hypervisors, to emulate a cluster
- Virtual router and virtual NAS to provide networking capabilities and shared storage inside the nested lab.
- Multiple “Infrastructure” Virtual machines such as Active Directory, vCenter and vCloud
- Multiple Hyper-V hypervisors to play with Microsoft’s offerings
Read more on nested virtualisation.
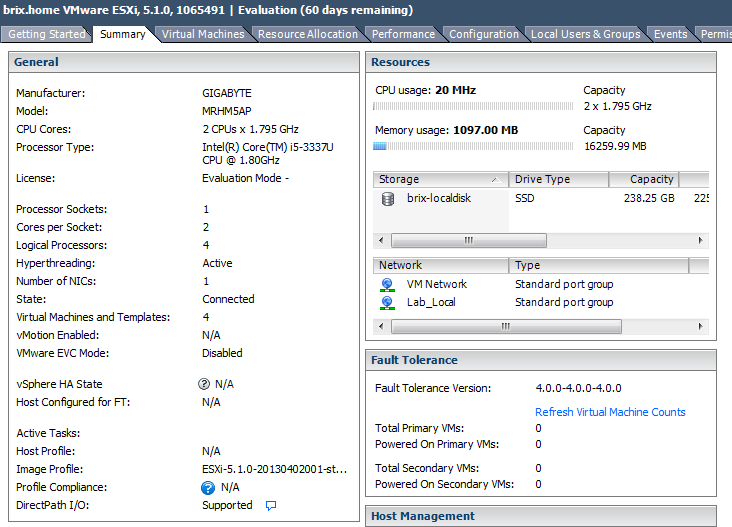
The Brix GB-XM11-3337 I opted for has an Intel Core i5-3337U 1.8GHz processor with Turbo Boost which supports both Intel VT-x with EPT (Extended Page Tables) for Nested Virtualization and VT-d for directly passing through connected hardware to a VM running on the ESXi hypervisor (The Core i3 doesn’t support VT-d, so bear that in mind if you fancy it).
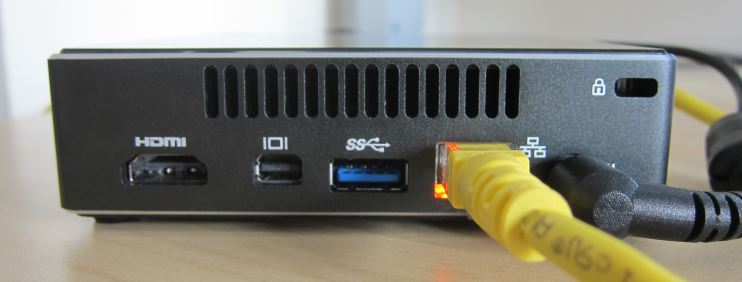
In addition, the Gigabit NIC is a Realtek RTL8111E which works out of the box with a standard VMware ESXi 5.1 install. For me, this makes it more attractive than the Intel NUC, which needs some hackery to get the driver installed. I’m not lazy; I’m efficient 😉
Putting it together
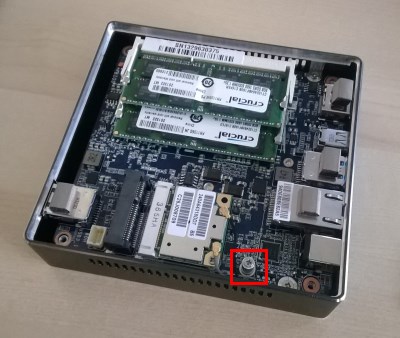
This is what I love about these barebones systems; they take minutes to put together. The RAM slots in exactly like a laptop, and the mSATA drive is easy to install. Gigabyte even include a screw for you to screw down the mSATA drive after installing it (just make sure to unscrew it before you install the mSATA drive!)
Configuration
Now everything’s installed, let’s tweak the configuration before installing ESXi.
You’ll need:
- A USB keyboard
- Either a TV or Monitor capable of taking a HDMI source, or a DisplayPort monitor.
I’ve been struggling to get the Mini-DP port to play nicely with my Dell U2412m, so I’ve resorted to using my HDMI TV for configuration.
Update: I’ve since found that a HDMI to DVI converter works well with my monitor. Mini-DP is still troublesome.
BIOS settings
- Enable Virtualization
- If you want lower idle and standby power usage, enable Erp. This does mean you won’t be able to use Wake-on-LAN, however.
Upgrade the Plextor M5M SSD firmware
The SSD arrived with Firmware version 1.02. This version appeared to have a power usage issue, which was picked up in the Anandtech review, but their testing method wasn’t 100% sound due to not being able to accurately measure the 3.3v rail. Either way, version 1.03 says it fixes a power consumption issue, so let’s upgrade the SSD.
As the Brix doesn’t have a DVD drive, we need to convert the ISO provided by Plextor to a bootable USB stick. Fortunately, Unetbootin does a great job of this:
- Download the latest version of the firmware in ISO format
- Download Unetbootin
- Write the ISO to a USB stick using Unetbootin
- Boot the Brix from the USB stick, and at the Unetbootin boot menu, choose the second boot option (the one immediately below Default).
- Follow the instructions to update the firmware. It’s very quick.
Installing ESXi
This is trivial, as all the components in the Gigabyte Brix are compatible with VMware ESXi 5.1 (woohoo):
- First you need to get the ESXi 5.1 ISO. You can get the Free Edition from VMware.
- Note: Unlike ESXi 5.1, ESXi 5.5 doesn’t support the RTL8111E NIC out of the box. I’ve documented how to get ESXi 5.5 to install on the Brix
- Download Unetbootin, if you don’t have it already.
- Use Unetbootin and a spare USB stick to create a bootable USB stick from the ISO you just downloaded. Anything bigger than 1GB is fine.
- Boot the Brix from the USB stick
- Install ESXi
Note: If you want to install ESXi to the same USB stick you booted from, you can. The install files are in RAM, so you won’t saw off the branch you’re standing on 🙂 Running ESXi on a USB stick is perfectly fine in a lab and as far as I’m aware won’t degrade performance while it’s running as the OS is loaded into RAM. If you don’t want to run it off the USB stick (it does look a bit untidy), install ESXi to the SSD.
That’s it! Easy-peasy 🙂
My next post will cover Enabling and setting up Nested Hypervisors on ESXi
Fancy Hyper-V instead of ESXi as your base hypervisor?
If you want to install Hyper-V on your Brix as your base hypervisor, check out Jeff Hicks’ articles: Mini Hyper-V: Setup