Scope
This post will cover how to setup a simple microapp that anyone with access to the Citrix microapps service can build, using public URLs, with no authentication requirements. We’ll be using the RSS integration to talk to a WordPress RSS feed and build a microapp from that.
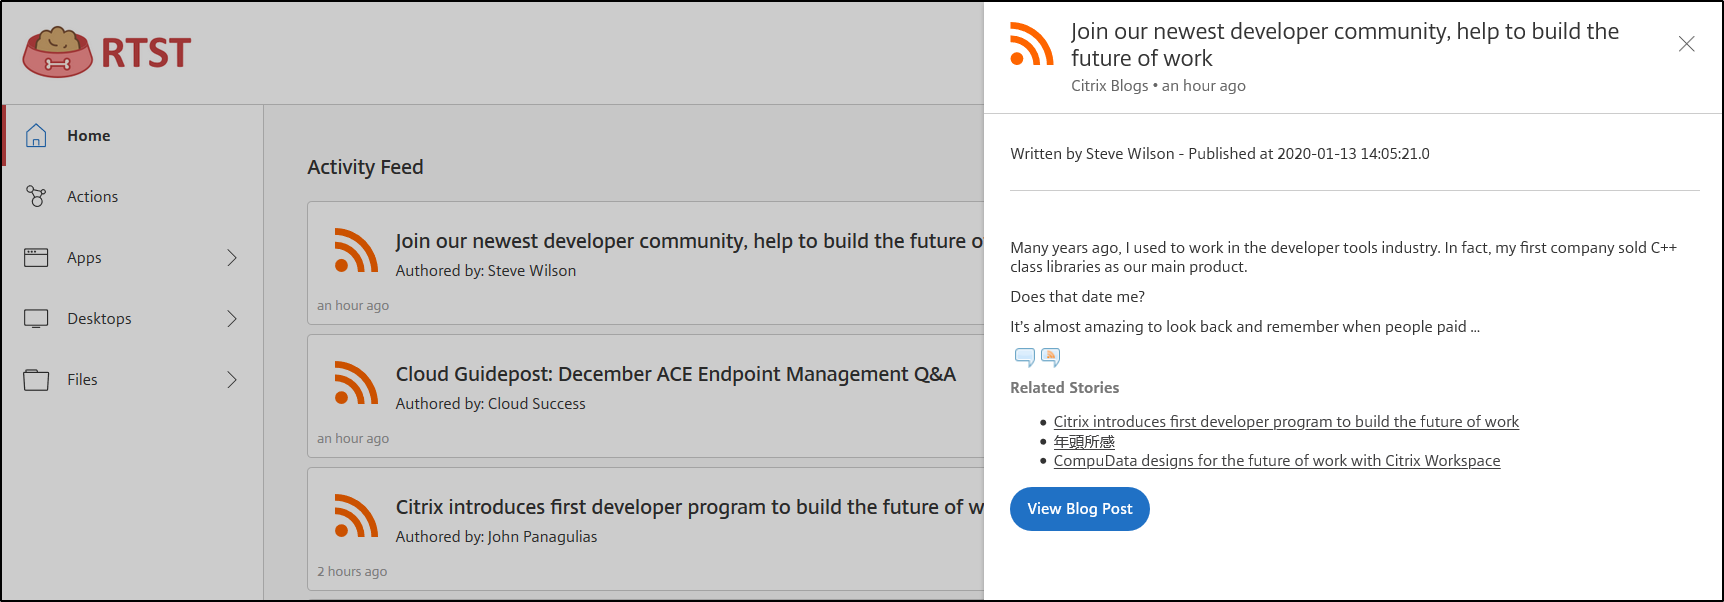
Here’s roughly how it’ll look in Workspace, when it’s finished:
Why bother?
I’ve spent the last few months learning about microapps, and implementing them into Citrix Engineering’s pre-release Workspace environments – and honestly, I wish I had a guide like this to follow when I first started. So here we are 🙂
My hope is that following this guide will help you get familiar with the concepts, before you dive into the heavier stuff, like accessing internal API endpoints for enterprise systems, or figuring out the details around Oauth 2.0 authentication.
By following this post you’ll learn:
- How to add an Integration and a microapp
- How to make changes to how a microapp displays data
What are we building?
We’ll build a Citrix Blog posts microapp, which uses the RSS Out-of-the-box integration to connect to the Citrix Blogs RSS feed, which happens to be in a WordPress format and:
- Notifies Workspace when there’s a new blog post
- Enables colleagues to view blog posts from Workspace
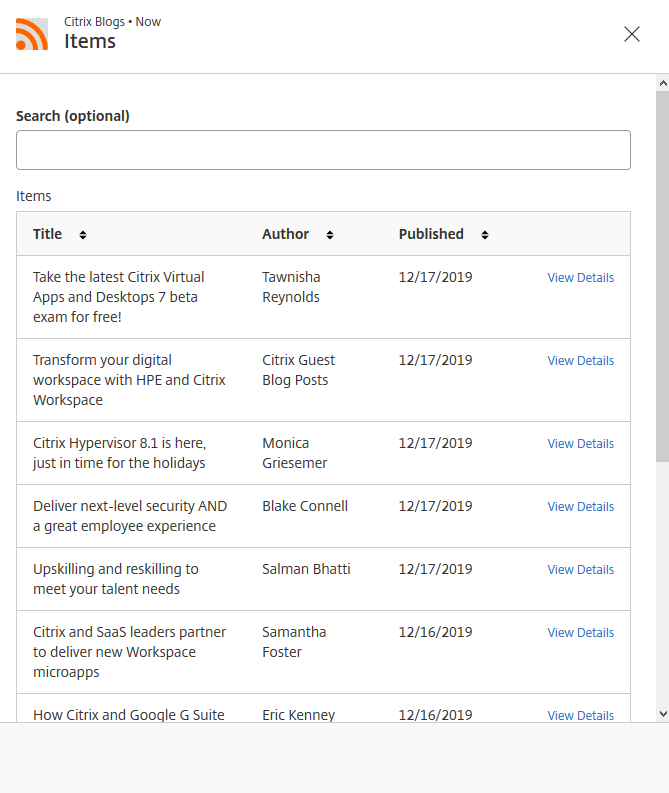
- Allows colleagues to view a list of blog posts in a searchable table
Before you start
This guide assumes that you already have access to the Microapps service in your Citrix Cloud account. If you do not, you can request access to a Test Instance here: https://developer.cloud.com/citrix-workspace
First, familiarise yourself with the following microapps concepts by reading the documentation that covers Terminology
Specifically you’ll need to learn the meanings of:
- Integration
- Microapp
- Notification
- Page
- Action
I’ll be using the above terms liberally, so knowing what they mean will help.
Let’s build it!
We’re going to:
- Add an RSS Integration to sync Citrix Blog posts
- Change the name of the microapp so it’s more intuitively named in Workspace Actions
- Change the sort order of Blog posts to: Date, Descending
- Change the Description field of the Item Detail page to show HTML content for prettier viewing
- Set the Title of the blog post to be in the header of the page
- Add a “View Post” button, that goes to the Blog Post online
- Setup the Synchronization Schedule
- Add Subscribers to the microapp (so they can see Notifications and Actions)
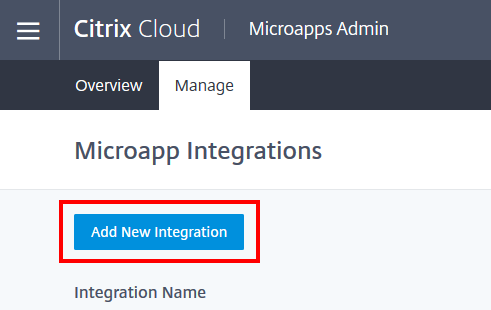
Add the Integration
Go to the Microapps Admin page, and choose “Add New Integration”
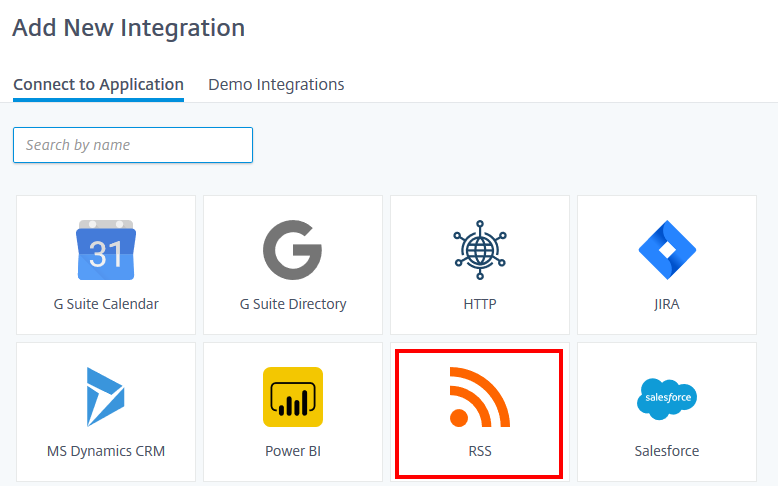
If asked, you want to use a Citrix-provided template
Choose the RSS Integration
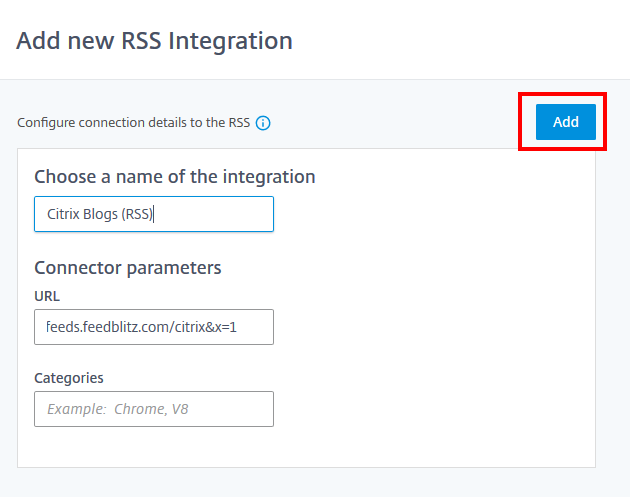
Give the Integration a name, such as Citrix Blogs (RSS), and enter the URL to the WordPress RSS feed. In this example, for Citrix Blogs, the URL to the RSS feed is: http://feeds.feedblitz.com/citrix&x=1
You’ll then be taken to the Microapps list of integrations, and you’ll see the new integration. Inside, it’ll already have a microapp configured called “Items”, and you’ll see it has Synchronized. We’ll be modifying this microapp to make it fit our needs.

Because the RSS Integration is deliberately generic – we need to make a number of tweaks to make the Blog microapp nicer to use and look at.
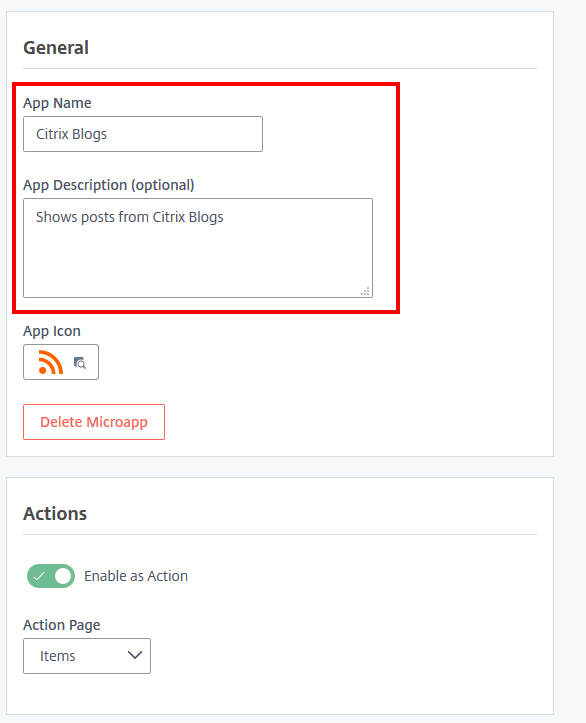
Change the name of the Microapp
We change the name of the microapp, because this is how it appears in the Actions pane in Workspace. If we keep it as “Items”, its naming isn’t particularly user friendly. In our pre-release environments, we rename this microapp to Citrix Blogs, so people will know what they get when they click the Action.
To change the Microapp name:
- Click on “Items”
- Go to Properties
- Change the App Name, and the App Description to something more meaningful such as “Citrix Blogs” and “Shows posts from Citrix Blogs”
- Click Save
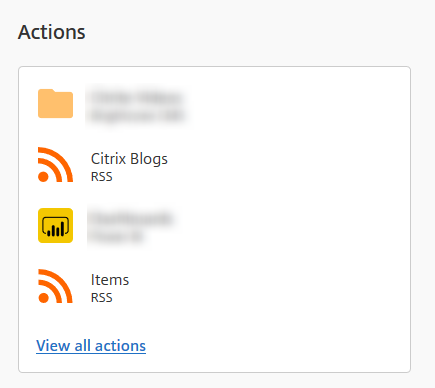
Here’s a comparison of how they’d look in Workspace. I much prefer it to say Citrix Blogs. rather than Items 🙂
Change the sort order of Blog posts to Date, Descending
Out of the box, the Items table is not sorted by Date. Let’s fix that so it’s suitable for a Blog post list that shows the latest posts at the top of the table.
In the Citrix Blogs microapp, click on Pages, then click on Items

Click the Table, so that it’s highlighted (a blue x will appear in the top-right of the table). Then click Set Order, or Edit Order, under Data Order
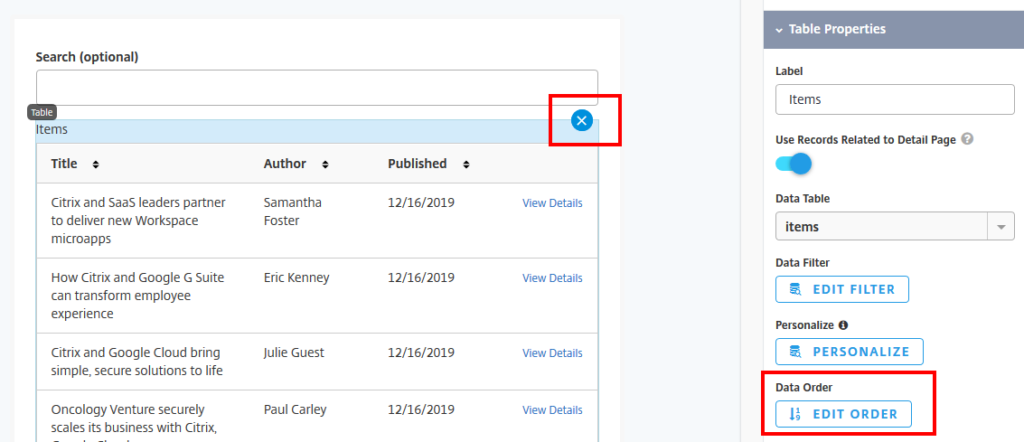
- Set the Order by to: items, published_at, Descending.
- Click Save

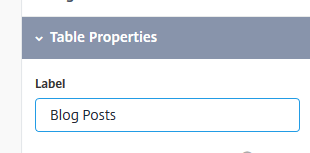
Bonus points: Change the table Label from Items to Blog Posts. Again, this just makes it look nicer.
Displaying HTML content from the blog posts
Just FYI: This HTML component is in the product at GA because I had issues with showing blog content in the microapp page, and the Product Management team did amazing work to accelerate their plans for this functionality. It sounds small, but it’s just one tangible example of what I (and my team) do inside Citrix – we use the product, we feedback, we help make things better
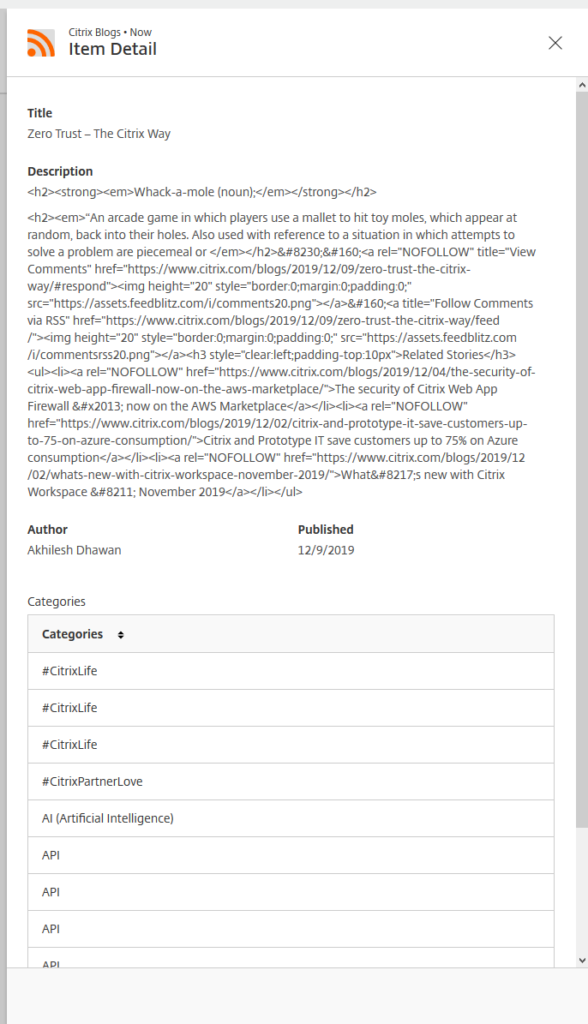
Out of the box, the RSS Integration shows raw text. It works really well for many kinds of feeds/data, but for some RSS feeds, the fields have HTML embedded in them.
Out of the box, it looks like this:
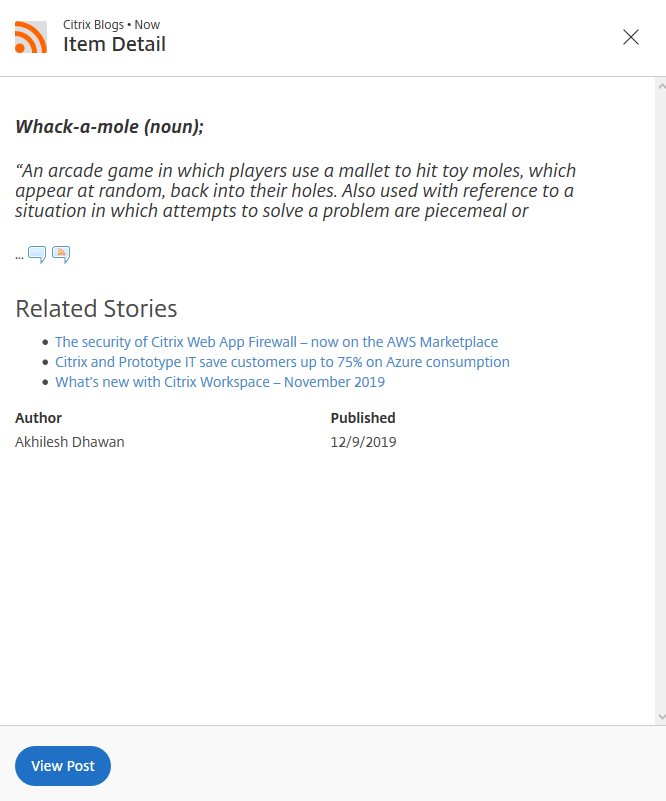
And we’re going to tidy it up so it looks like this:
Add the blog title to the header of the Page
Set the Blog Title as the page title and remove the existing title. This makes the title look much nicer:
- Go to Pages, then click on Item Detail
- Click the Back button in the Builder viewer
- In the right-hand pane, set the Title Template from blank, to
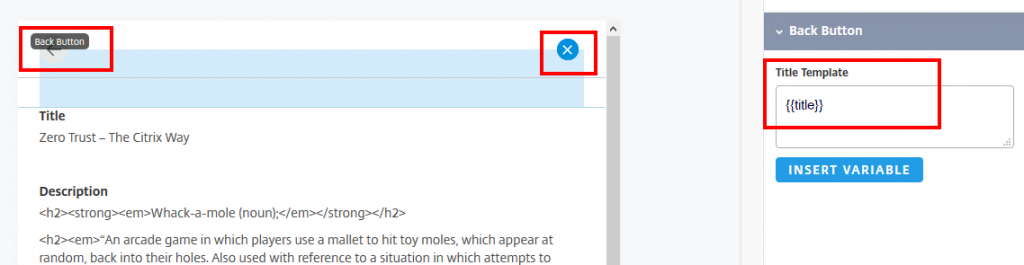
- Click the Title text in the main body of the Builder viewer, and delete it (because the title is now shown at the top of the page)
- This will now show the Blog post title in the Page header (and looks much nicer)
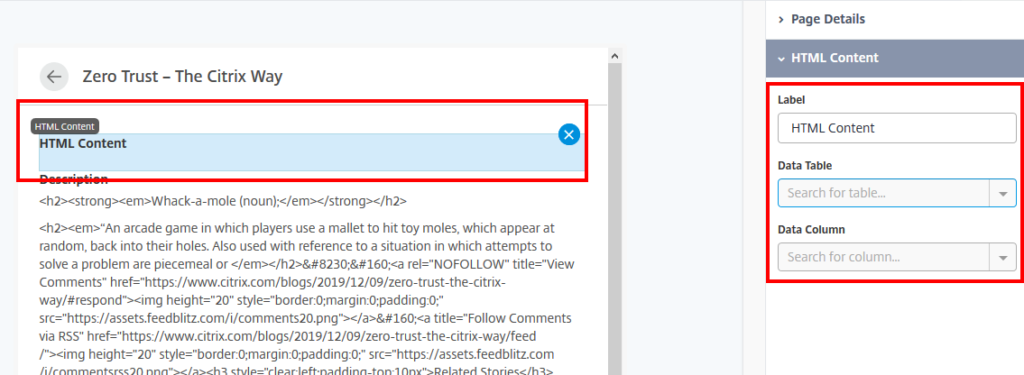
Replace the Description default Test component, with the HTML Content component:
- Drag the HTML Content component so it goes above where the current Description text component is
-
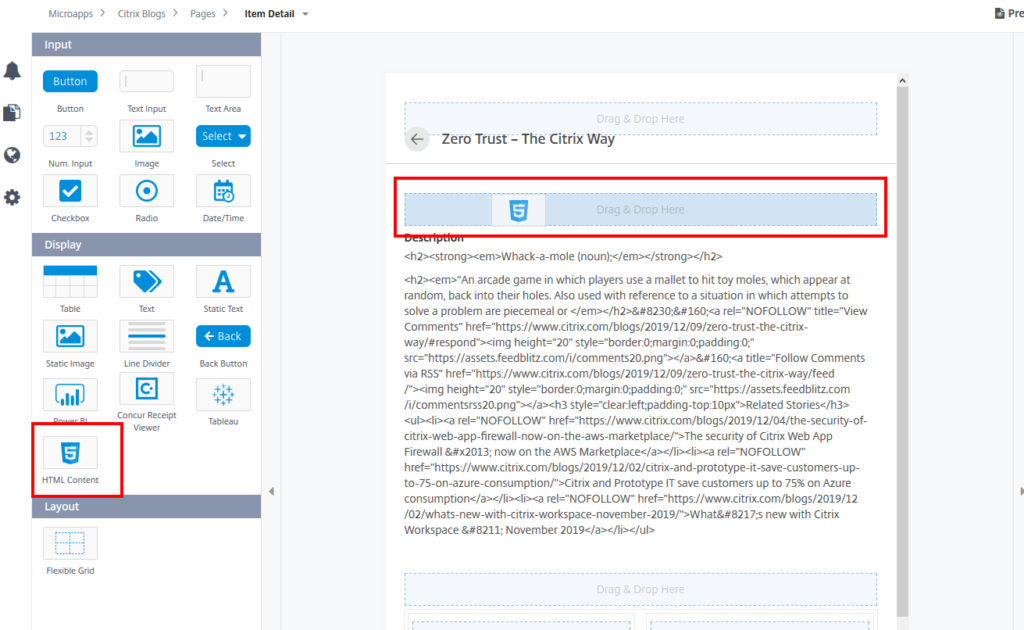
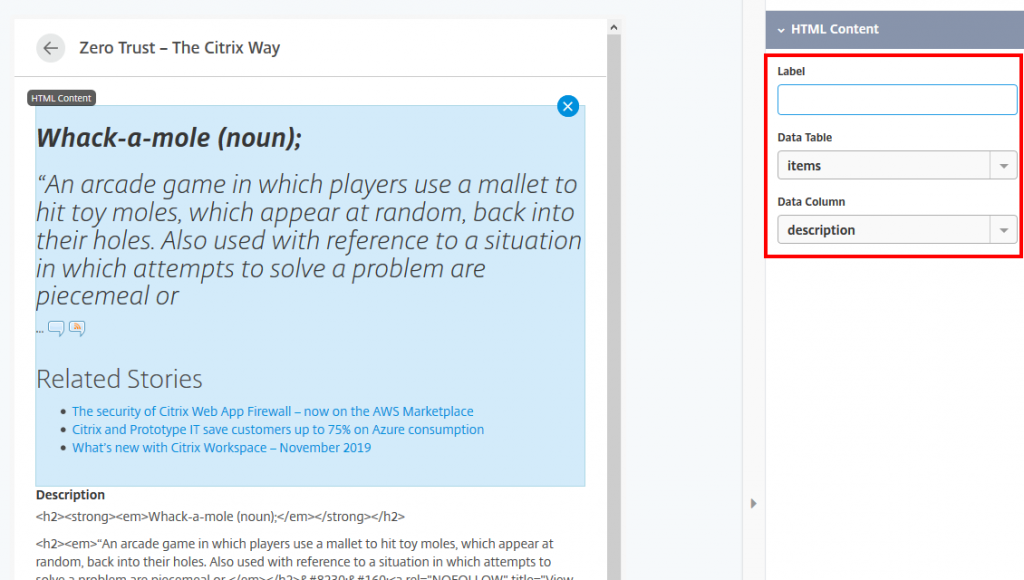
- Set the Label (you can make it blank – it’s not required) and set the Data Table to “Items” and the Data column to “Description”
- Delete the other Description component, by clicking on it, then clicking the X in the top=right hand corner.
It’ll then populate the HTML component and look much nicer!
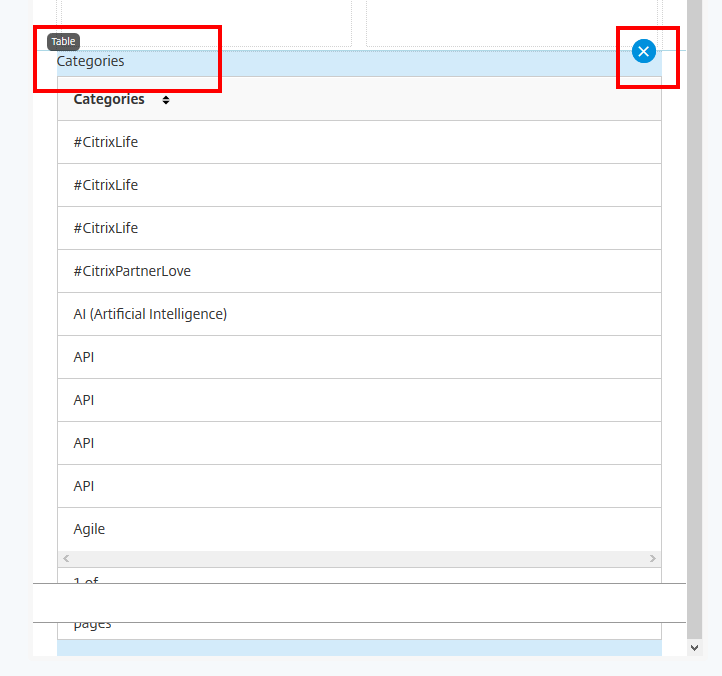
Personally, I remove the Categories Table, as it serves no purpose in this view. Click it and remove it with the X in the top-right corner of the Categories Table.
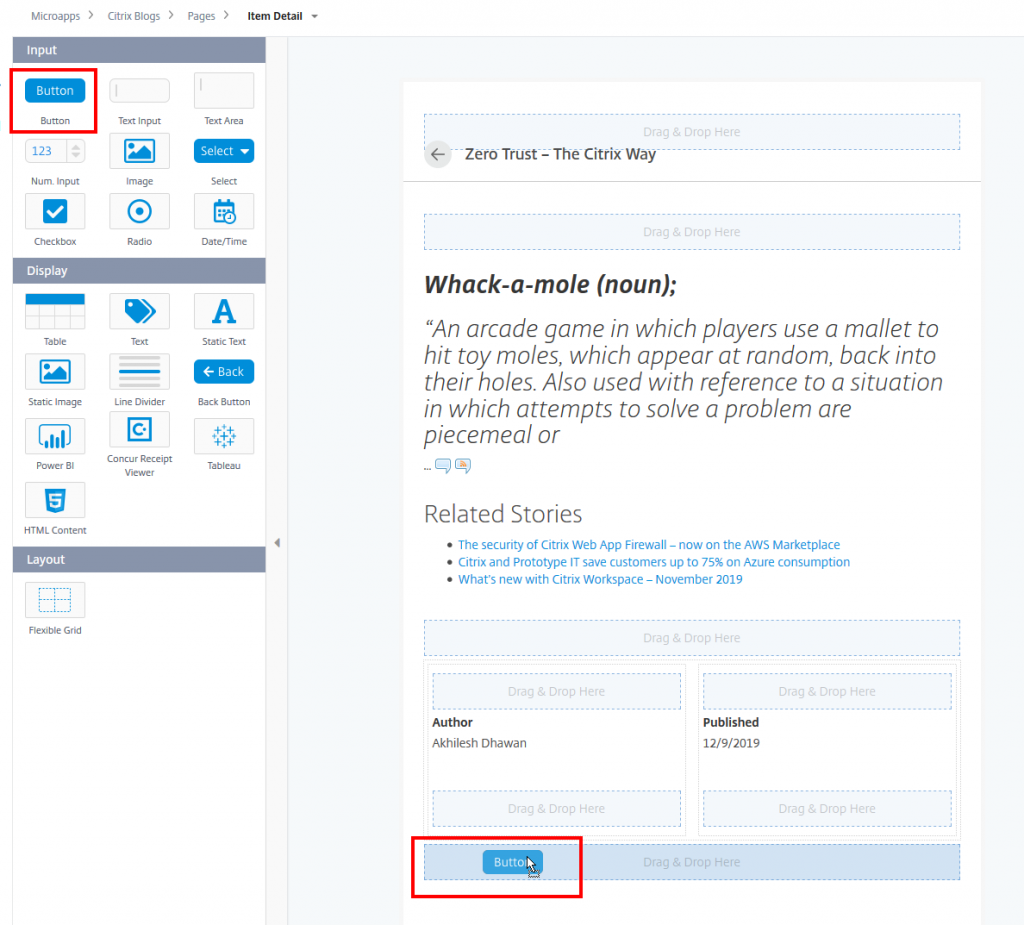
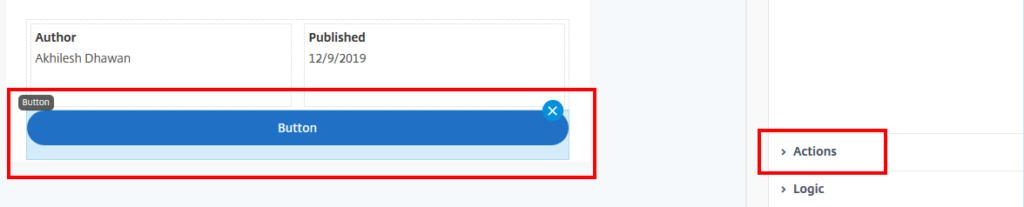
Add a button to link to the Blog Post
Finally, let’s add a button to link to the Blog Post. This is a nice way to allow people to open the blog post if they want to read more than just the lede.
Drag the “Button” button to the bottom of the page:
Then, set the button up like so…
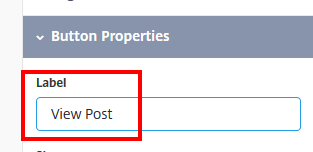
Change the Button Label from Button, to “View Post” (or whatever you’d like it to say :))
Now we setup the link part.
Click Actions, on the right hand side:
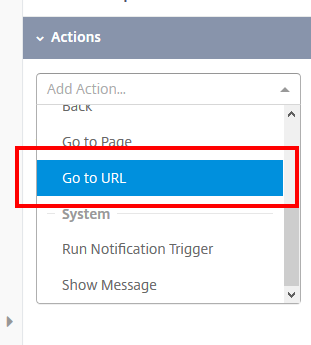
Then on the Drop down, choose “Go to URL”
Expand the Goto URL, then click on Insert Variable
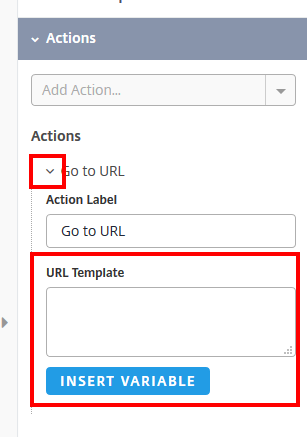
From the dropdown, choose “url” and click Insert:
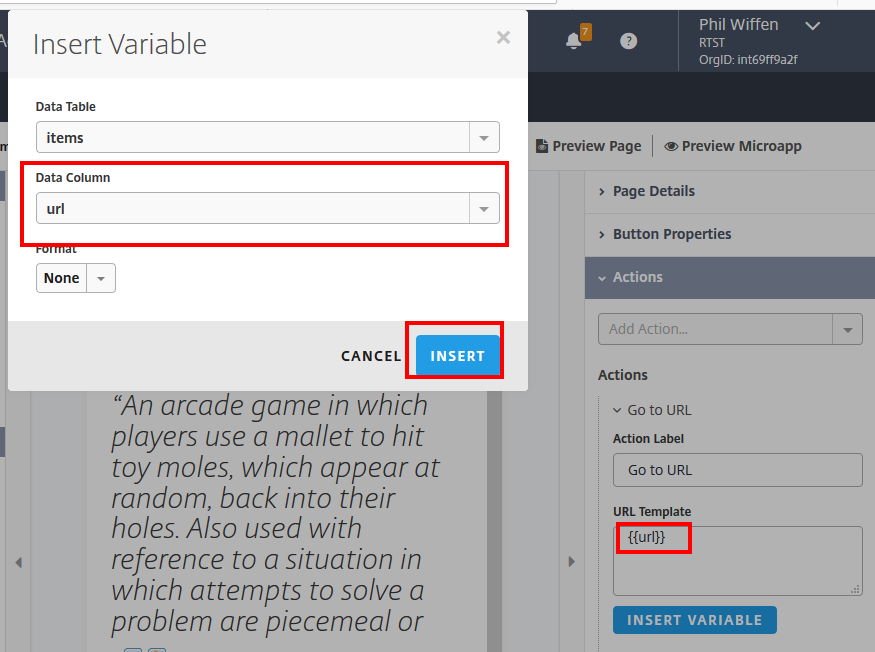
You’ll then see the field populated with . This will insert the Blog Post’s URL into the button, and will launch the site when clicked.
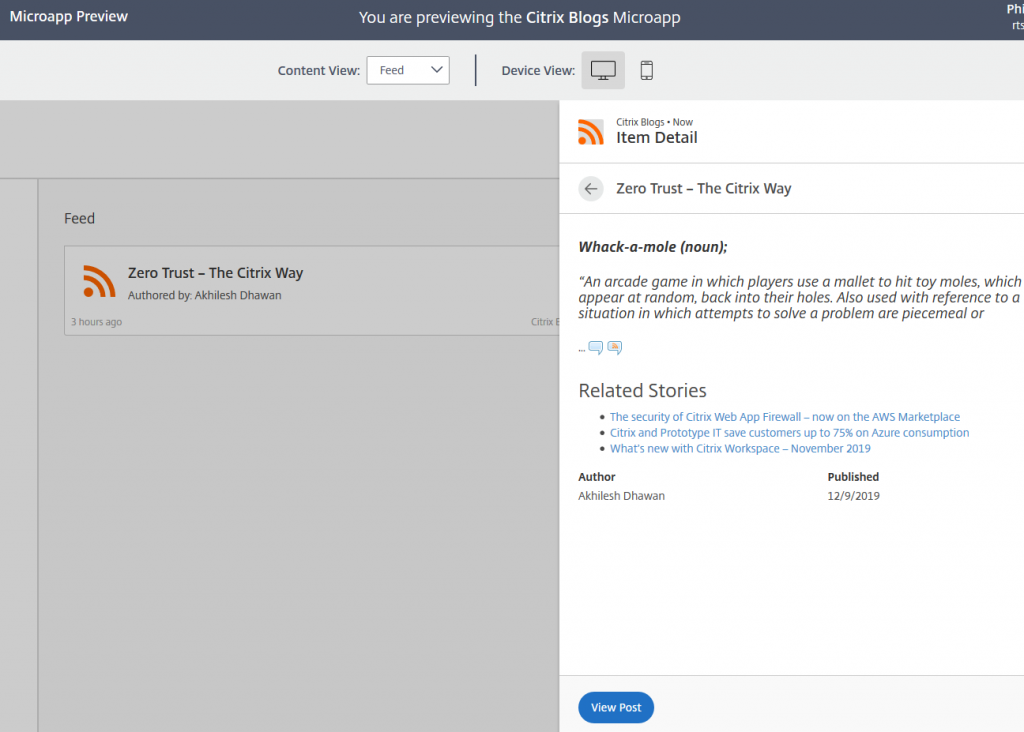
Preview the microapp to see your handiwork:

Looks good!
Set a Synchronization Schedule
Now we’ve made the microapp, with its pages, we should set a Synchronization Schedule.
The schedule is up to you and the feed you’re pulling in. For Citrix Blogs, we set this to once every hour, which is a good balance between keeping things up to date, but not hitting the website too much with requests.
After a sync happens, if a new blog post entry is found a notification is sent to Subscribers to that microapp, and it appears in the Workspace feed (and, if enabled, a Push Notification to the person’s device with Citrix Workspace app, too)
Please note: The first time you sync – no Notifications will be generated. So when you look in your feed, there won’t be any Notifications yet. This is because notifications are generated the next time a sync occurs and there’s new blog posts. The first sync will simply load up the microapps cache. You’ll need to wait for a new blog post to be posted into the RSS, and for a sync to happen, for a notification to be generated.
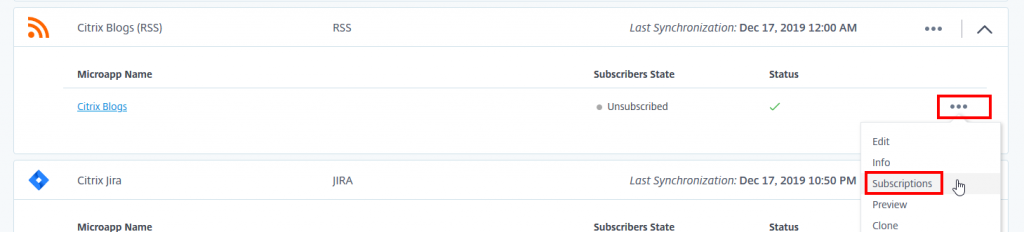
You set the Synchronization by going to the Microapp Integrations page, clicking the three dots next to the integration and choosing Synchronization

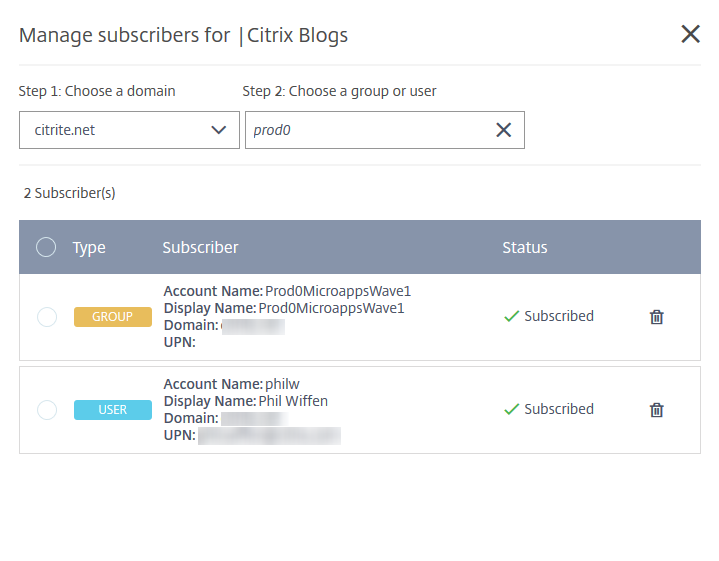
Adding Subscribers to the microapp
The final step of this process: Giving people access to the microapp itself. Without being granted this, people won’t see the microapp, or the notifications
To give people access, Click the three dots next to the microapp, and choose Subscriptions
In the example below, I’m showing that you can add Security Groups, as well as individual users. This can help you test, and gradually roll out the microapp in a live environment in phases, to help ensure quality and user acceptance.
Pat yourself on the back
You just made your first microapp!
You learned how pages work, how to modify those pages if you need to, you learned about changing and adding variables to buttons and components, how to order data in tables, add buttons that link somewhere else, and finally how to add subscribers to a microapp, schedule synchronizations and how to preview it.
There’s a lot to take in, but hopefully running through this will make it easier on you when you come to do more heavy-weight microapps that might need things like authentication, and on-premises connections with the Connector Appliance.
Happy microapping 🙂